Sunday, September 15, 2013

Flying Tyrant (gw model)

This is thé most ambitious multiple-kit project I've worked on so far and I'm pretty happy with how it turned out.
All of the bits to build a Hive Tyrant (talons, lashwhip and bonesword), Swarmlord and Flying Tyrant with 2x dual devourers (each weaponarm is a dual devourer)
HQ in bits photo IMG_5609_zpsbf29014d.jpg

Hive Tyrant/Swarmlord base:
Base Swarmlord - Tyrant photo IMG_5600_zpsce962918.jpg

Hive Tyrant
Hive Tyrant photo IMG_5610_zps4e4c5294.jpg

Hive Tyrant right photo IMG_5611_zpscdd666ca.jpg

Hive Tyrant back photo IMG_5612_zps0cac4048.jpg

Hive Tyrant close photo IMG_5613_zps4fea2b46.jpg

Hive Tyrant left photo IMG_5614_zps58061714.jpg

Swarmlord
Swarmlord photo IMG_5616_zps7cfd5b40.jpg

Swarmlord right photo IMG_5617_zps7f7d77a5.jpg

Swarmlord back photo IMG_5618_zpsc5d07a94.jpg

Flying Tyrant
Base:
Flyrant lower half photo IMG_5532_zps1e653356.jpg

2 dual devourers
2x Dual devourers photo IMG_5534_zps89497754.jpg

Build:
Flying Tyrant 2x dual devourers photo IMG_5619_zpsddfbbf36.jpg

Flying Tyrant close up photo IMG_5620_zpsa1504627.jpg

Flying Tyrant dynamic photo IMG_5621_zpsa0b9984f.jpg

Flying Tyrant back photo IMG_5622_zpsd32be0f0.jpg

Flying Tyrant back close up photo IMG_5623_zps7b098075.jpg

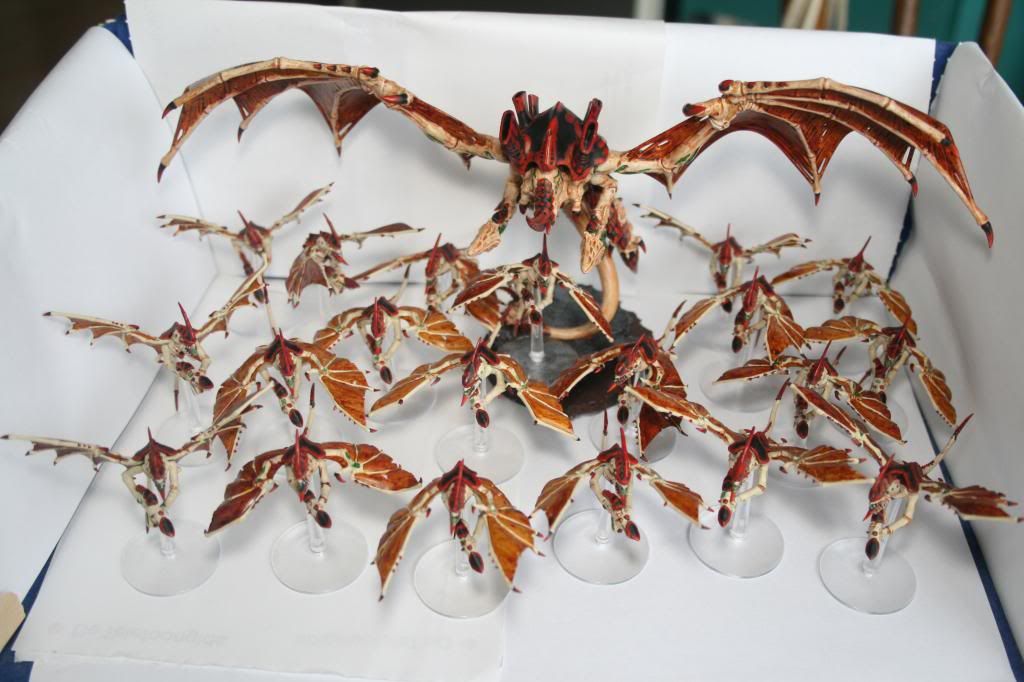
Flying Tyrant and friends (20 gargoyles)
Flying Tyrant and friends photo IMG_5625_zps175a5977.jpg

Flying Tyrant friends 2 photo IMG_5626_zps493a76c5.jpg

Flying Tyrant friends 2 photo IMG_5626_zps493a76c5.jpg

 photo IMG_5629_zpsf1dc7c47.jpg


Labels: , , ,

Tervigon 2

The other tervigon: Tervigon 1
I've had Tervigon 2 finished for a while, but didn't take any  pictures before. Both bases need some finishing touches (grass and whatnot).

Tervigon 2 photo IMG_5602_zps7420d64f.jpg
In this case I only magnetized the head and the talons because I'm not happy
with how the magnetized sack of #1 turned out and I decided it wouldn't matter
too much if I just switched out the arms and head when fielding two Tyrannofexes.

Close up
Tervigon 2 birthing photo IMG_5603_zpsb58a33d8.jpg

I've got a love/hate relationship with close-ups, they make you find the missed or damaged spots on your models:
 photo IMG_5605_zpsca53b68d.jpg

 photo IMG_5606_zps1be64164.jpg

Birthing some more photo IMG_5607_zps9f69f9e9.jpg
Birthing some more
Birthing even more photo IMG_5608_zps7f3cef41.jpg

Both Tervigons
 photo IMG_5632_zpscaab1050.jpg
The 'eggsack' has a different color than the one from #1 which was
caused by a thinner fleshwash. At first I thought I might want to add a
2nd thicker layer, but in the end I decided I liked how it turned out.
 photo IMG_5635_zpsc21356fc.jpg

Close up on Tervigon 1
 photo IMG_5636_zpsfa399daa.jpg

Labels: , ,

Wednesday, August 28, 2013

August Annihilation 25-8-2013 Game 3

In my third game I was up against a Evert-Jan's Nurgle Chaos Space Marine and Nurgle Daemon army.

His list (as far as I know)
Daemon prince with wings with poison 4+ instakill weapon
Great unclean one (6 wounds T6, 5+ inv save with possibility for FnP)
1 or 2 units of plague bearers (t5 poison 4+ and shrouded)
2x 2 obliterators, the 'dreadnought'
2 Nurgle marine squads (t5)
Heldrake (flyer with s6 ap3 flamethrower)

Expectation
I didn't know the instakill ability yet, so the Great unclean one looked like the worst thing on the table (at least before the heldrake would arrive). A lot of T5 on the table and 2 very creepy big ones. Not much long range shooting though, so it would be a challenge, but not impossible.

Game on
I again got first turn. I have to say I've been lucky with getting first turn.
First it has to be said that we laughed a lot about our deployment (and so did the guys next to us). Since both armies are best in close quarters, we deployed the objectives in a 4x4 range instead of using the 6 foot wide table. We basically ignored 2x4 feet of the table :)
Having learnt from game 1 and 2 I deployed the Trygon. Now I had to pick a target which would need to be First Blood. The Great unclean one had 6! wounds on T6 and a 5+ inv save and the daemon prince had t6 4 wounds, but a 3+ save. Even with 24 re-roll to hit shots s6 I probably wouldn't be able to kill any of the marine squads so I went for the Great Unclean one. Both Tyrants blazed and killed it outright. Pfew...
The Daemon prince (just left of the right Flying tyrant was unharmed still).

16 photo IMG_5597_zps52639d31.jpg

The Great Unclean one got send back to the warp before it got a chance to do anything but look evil.
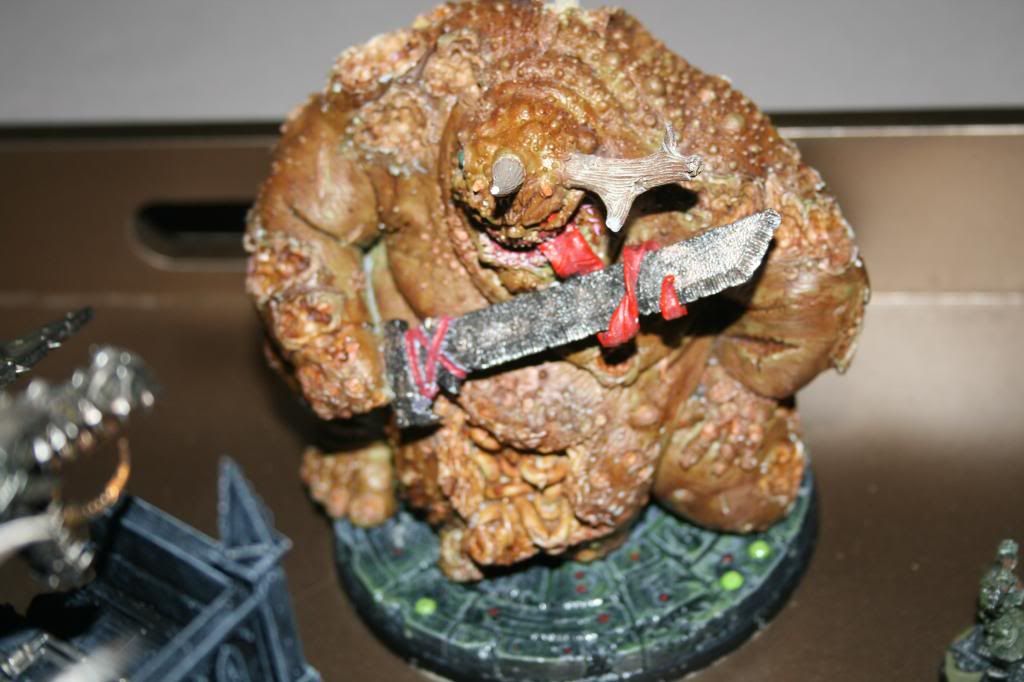
 photo IMG_5596_zpsaf141bae.jpg

Evert-Jan is giving off a dark look. Not sure why the Inquisition is letting him get away with wearing their shirt...maybe they were in on it? Whatever, rotting food is food too.
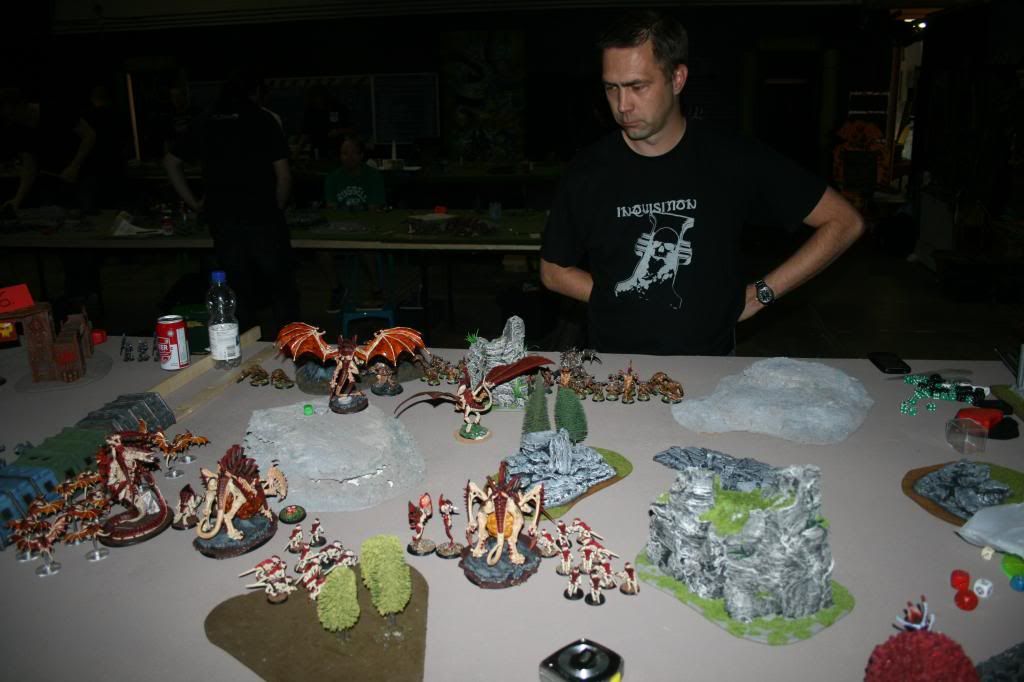
 photo IMG_5595_zpsddb37e80.jpg

Sadly I didn't get around to taking more photo's...it was too tense of a battle I guess.
The Doom arrived in T2 and killed a bunch of marines and got stuck in a squad of marines before it (t3 or 4) got instakilled.

In the meanwhile
The Daemon prince turned out to be a real nasty beast. When the flying tyrant was grounded, it charged (took a wound from overwatch) and instagibbed my Tyrant. With Initiative 8 and poison 4+ instakill attacks, this was no challenge. I wtf'd. This beast has to die, and quick!
In the meanwhile, my Gargoyles moved up leaving room for the Trygon (left flank) to assault the obliterators which were coming close. I charged, managed to hit and wound all 7 normal attacks.
EJ claimed they were ap3 attacks instead of ap2 as I've always thought..since we didn't find anything about it after 5 minutes of paging through the book I gave him the benefit of the doubt. Looked like I had to declare Smash attacks (halving the number, doubling the strenght), which I didn't. They made all saves and hurt my Trygon (which was already down to 3 wounds out of 6). After that, the Daemon prince came in and killed it instantly, just like it had with the Tyrant. I checked back later...I díd have ap2 attacks (check the entry for Smash).
I'm not mad about it, it's just a game and these things happen, but it wóuld have greatly influenced the game.

Daemon prince
Somewhere either before or after it charged the Trygon, I Vector striked the daemon prince with the remaining tyrant which took it down to 1 wound. It was now on the move to kill off the rest of my army and it wouldn't have a problem doing so. It hád to die.
Plan A: shoot the hive guards (4 shots s8 ap4) missed, no wounds or saved. Plan B: Zoanthropes: 1 wound, cover saved. Plan C Psychic Shriek with a tervigon: dénied. Shit...out of options...this is going all wrong.
Wait...maybe..just máybe...Plan D. There were just some gargoyles left after the Heldrake burnt most of them. How many times haven't I lost my tyrant to lasgun fire... ok. Here goed. I roll 1 hit (s4 ap5), wound on a 6...and......................He fails!!!! Wow, my beast of the match, instantly.

Obliterators
The obliterators (which should've died earlier..) moved up though and the Heldrake refused to go down too (darn daemon saves) and burned gargoyles and gants at leasure. The obliterators killed off some gaunts and managed to contest one of my objectives. The other one I kept.
I tried hard in his deployment zone. The Flying tyrant vector striked and shot and whatnot..but eventually it was just out of reach to contest one objective and the shrouded plaguebearers shrugged off my 12 shots.
I tried to contest the other objective by running up a squad of gants, but too little, too late.

Result
EJ had 2 objectives and contested a 3rd.
I had the final one.
I had first blood and line breaker. He had slay the warlord and linebreaker.
I had 3 killpoints (great unclean one, daemon prince and a 'dreadnought')
He had 1 Tyrant, 1 trygon, the doom and its pod, 1 tervigon and 1 or 2 squads of gants.

Captain hindsight
A véry very close call. I lost, but had a great match againts a cool opponent. It sucked that the Trygon died before it could do anymore damage...in hindsight it would've killed the obliterators, which might have made the difference. I also should have tried running the tyrant as close as possible to the objective held by the plague bearers to contest it and the gants running up should've tried assaulting..but that would have been a hit-or-miss too.
My 'man' of the match: the Gargoyle who was a last minute plan D to take out the Daemon prince..and did.
His 'man' of the match was that Daemon prince which instagibbed my tyrant, my trygon and attention whored across the board.

Labels: ,

August Annihilation 25-8-2013 Game 2

2nd game vs Cees-Jan with a combination of Eldar and Tau.

My list: see Game 1
His list:
- Eldar guy on jetbike, Tau xv8 commander
- 3 wave serpents, 2x 3 jetbikes
- 2 Fire prisms
- 1 Tau sky ray and a Riptide

Mission: the scouring on a Hammer and anvil deployment.

Expectation: 
The enemy and the deployment in game 2 are probably one of the worst match ups I could find although there was also an Imperial Guard player with 3 Vendetta's which would've been worse.
I expect my enemy to sit in a corner and take me out until there's room to manouver.

I got first turn again. Put the 2 termagant squads on the nearest objectives and then moved forwards. I had to. The enemy was just out of reach of a first turn shooting, so first blood would be out of the question and I would suffer in his T1. If I didn't move, he'd move and still shoot the crap out of me.

The skimmer colony all castled up, with only the sky ray with av13 in range of
possible tyrant fire, which is too high to damage.
10 photo IMG_5586_zpseb268c1f.jpg

Everything except the objective holders moving up.
11 photo IMG_5587_zpsb1cd0a4a.jpg

Liam's tower of power got a sci-fi treatment.
The doom of Malantai's pod scattered a horrible 11 inch exactly the wrong way,
the Doom got out, didn't do anything since it wasn't in range.
The trygon álso scattered a similar horrible distance. I should've fielded it instead of deepstriking.
Sounds familiar, but the lesson was only learned after game 2.
12 photo IMG_5588_zpsfe05f3ec.jpg

Flying Tyrant #1 was already down and #2 was dying...
13 photo IMG_5589_zps691d3286.jpg

Tervigon one got killed, the termagants which were close were basically wiped
out by the psychic backlash -> 3d6 -> 14 s3 hits against bóth squads.
14 photo IMG_5590_zps74edb3bd.jpg

Skyray immobilized, Wave serpent destroyed and a Fire prism destroyed.
But this was the only damage I did.
15 photo IMG_5591_zps5d27c2bd.jpg

For the Eldar and Tau it was a case of clean up on isle 13 (table number), and move out to the objectives in turn 5.
I got completely tabled.

Reasons why I got tabled in no particular order
1: Bad match up: skimmer circus vs Nids, although hive guards help.
2: The enormous distance in Hammer and anvil, made sure I wouldn't get a shot of in turn 1 and it would take a big part of the army quite a while before they got in range.
3: I should've deployed the Trygon, it would've kept the Eldar skimmers in the corner longer and a bit more trouble with target prioritizing. Now it scattered off to a useless distance.
4: The Doom scattered almost to the max and failed the 2nd save it had to make which instakilled it.
5: Maybe I could've run the tervigons up more to put more pressure.
6: My opponent was very experienced. Knew exactly what he was doing and what he was fighting.

Fun: Considering that I don't see the fun in the opponents armylist, I did have a good time. The armylist basically meant no infantry at all on the table untill 1 sq had to get out of a burning wave serpent in t3 or so and the others only got out in t5 or so to secure the objectives. I wouldn't have enjoyed playing the other side. On a final note, playing against a half-painted army does take a bit of the fun out of the game for me, since it feels more like a random game instead of a 40K battle with 2 painted armies.

Labels: ,

Tuesday, August 27, 2013

August Annihilation 25-8-2013 game 1

I entered a Warhammer 40K tournament (1723pts) in Veendam at Kunstkot.

First up, Lee with his Dark Angels. The setting was Crusade with Dawn of war deployment: 5 objectives.
I've played against him before, but I was sure he would've added stuff to his army.
Their enormous output of bullets can be scary.

My list:
2x Flying Hive Tyrant with 2x dual devourers. 1 with hive commander, 1 with poison.
2x Hive guard, 2x zoanthrope, Doom of Malantai in a pod
2x Tervigon with 3 powers and poison, 2x 10 termagants
15 Gargoyles with adrenal glands
1 Trygon (1720pts)

His (as far as I know)
Some commander, a command squad, 3 (?) tactical squads, 5 Terminators,
10 assault marines (in reserve)
Dreadnought with rocketlauncher and assault cannon
2x landspeeder (heavy bolter and assault cannon?)
Razorback tank with some marines, Aegis defence line with quad cannon.

Game on
I got first turn, which is a good thing since the flying tyrants don't want to get caught on the ground.
1 objective was in my far right corner, the others were pretty close to eachother on the left half of the table.
The plan would be to hold the objective in the right corner with a cheap unit and focus everything else on the other 4. That is, capture them and kick the enemy off the others or at least contest them.

You can see my (Tyranid) deployment and Lee standing across the table in white.
1 photo IMG_5572_zps8e23f81c.jpg

My Termagants were hugging the objective on the far right.
2 photo IMG_5584_zpsb7fb6f98.jpg

The two flying tyrants moved up fast. Everything else moved up equally.
3 photo IMG_5574_zpsd27e3f72.jpg

First blood! Well..scrap. It took 1 tyrant and the hive guards.
4 photo IMG_5575_zpsf396bcbb.jpg

And a landspeeder got taken out. The Tyrant flew around Iron Armed on S/T9
5 photo IMG_5577_zpsc1c458c4.jpg

While the Tyrants were having a field day, the spawned gaunts
got shot up by the dozen. Keeping those objectives was an effort.
6 photo IMG_5578_zpsc61d26d1.jpg

The Trygon burst from the ground near the far right objective to, if need be,
defend the objective against the assault marines.
7 photo IMG_5580_zps2e5d08e9.jpg

The Tyrants were wreaking havoc shooting and charging.
8 photo IMG_5581_zpscb6ef7ff.jpg

The assault marines were still sleeping in turn 2 as Lee forgot to call on them.
They did show up on turn 3, but too little too late.
9 photo IMG_5583_zpse3ddce86.jpg

At the end of turn 3 we had to call it a day since time was up.
Because Lee had the objectives concentrated on one flank I could focus one 2/3rds of the table.
The Tyrants killed off the vehicles and quickly after that had a field day in the back lines. Rolling high on Iron Arm helped making one of them véry hard to kill.
They weren't doing the killing all that fast due to imperfect dice throwing in combat, but that wasn't bad since they could get out of close combat at the end of the opponent's turn. The Doom of Malantai did nothing except for putting a scare on Lee for a turn. He passed 3 leadership tests on 3d6 and then killed the Doom off.
The Trygon did nothing much but turn up and roar a bit.
The Tervigons were moving up and securing objectives while keeping Lee occupied with cannonfodder to kill. The Hive Guard did their job, killing armour.

Result
In the end I held 3 objectives, including the one in the right corner and contested the other 2 with the Tyrants.
The majority of the marines were either killed or about to be killed in the 4th turn if we'd had it and the razorback and the 2 landspeeders were wrecked, as was the quad cannon. The HQ choice was dead, 2 of the 5 terminators were gone, there was a dreadnought left and the assault marines who came in late.
It made for a solid win.
Lee's assault marines should've been called on in turn 2, but the best they could've hoped for with their load out was to contest 1 objective.

Learning points:
I didn't need to deepstrike the Trygon. I was lucky Lee forgot his assault marines in turn 2.
The Tyrants were awesome with iron arm and endurance. For the rest, I won the game mostly on tactical experience and a lack of heavy weapons.

Labels: , , ,

Monday, July 29, 2013

40K: Bastion and Aegis defence line guns WIP

Scenery I've been building and painting for my local wargaming club
The Icarus cannon and the Quad gun are finished, the antenna and Bastion itself are still very much work in progress.

Icarus Cannon
(can be turned around, panned up and down and dismounted from the block)
Icarus left photo IMG_5494.jpg

Icarus right photo IMG_5497.jpg

Haven't painted the lamp yet, didn't have yellow :)
Icarus top photo IMG_5496.jpg

Quad cannon mounted on pin-base
Quad on 3-pin photo IMG_5498.jpg

Quad cannon en Icarus cannon switched around
Icarus and Quad photo IMG_5500.jpg

Bastion with quad cannon.
The Bastion clearly needs a paint job on the outside.
  Bastion Quad photo IMG_5501.jpg

Bastion with Icarus cannon
   photo IMG_5502.jpg
Bastion: Heavy Bolter (can turn and pan up/down)
Bastion Hbolter photo IMG_5503.jpg

Antenna (very much WIP)
  Antenna 1 photo IMG_5504.jpg    Antenna statue zoom photo IMG_5506.jpg
Antenna 2 photo IMG_5507.jpg      on Bastion:  Bastion with antenna photo IMG_5508.jpg

Labels: , ,